ShareX Settings: A Practical Map
ShareX splits its options across four screens. Knowing which screen owns what makes every other change quick.
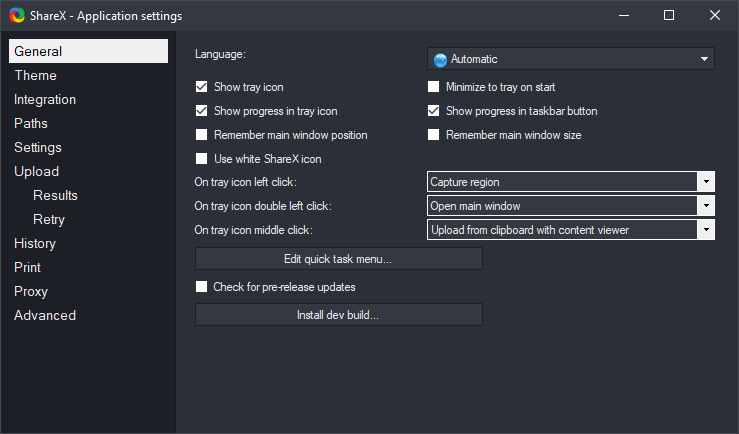
ShareX offers extensive customization options, allowing you to tailor its behavior to your specific workflow. Understanding where these settings are located and how they interact is key to efficiently using the application. This guide provides a practical map to navigating ShareX's configuration, from general application behavior to specific capture and upload preferences. Most settings are accessible from the main ShareX window. You can open this window by double-clicking the ShareX icon in your system tray, or by right-clicking the icon and selecting "Open main window."
The Four Settings Screens
ShareX organizes its numerous settings into four primary screens, each accessible from the left-hand menu in the main window:
- Application settings: These control the overall behavior of ShareX, such as startup options, user interface appearance, and file saving paths.
- Task settings: This screen defines what happens during and immediately after a capture, including image effects, watermarks, and actions like copying to the clipboard or saving to a file.
- Destination settings: Here you configure where your captured content is uploaded or saved, including various cloud services and local folders.
- Hotkey settings: This is where you define custom keyboard shortcuts for different capture methods and tools.
These four areas cover almost every customizable aspect of ShareX, providing granular control over your screen capture and sharing experience.
Application Settings: Startup, Theme, and Paths
The "Application settings" screen controls ShareX's general behavior and appearance. To access it, click "Application settings" in the left menu of the main ShareX window.
General Settings
This tab includes fundamental options like:
- Start with Windows: Toggles whether ShareX launches automatically when Windows starts. Keeping this enabled ensures ShareX is always ready when you need it.
- Check for updates on startup: Determines if ShareX automatically checks for newer versions when it starts.
- Show tray icon tooltips: Controls whether small pop-up messages appear when you hover over the ShareX icon in the system tray.
Paths
The "Paths" tab is crucial for managing where ShareX saves its files.
- Custom capture folder: By default, ShareX saves images and videos to a subfolder within your Documents folder. You can specify a different base directory here. ShareX will then create dated subfolders within this custom path.
- Use custom capture folder for screen recordings: This option allows screen recordings to be saved to the same custom folder structure as images, or to a separate default location if unchecked.
- History file path: Defines where ShareX stores its history database. Moving this is generally not recommended unless you have a specific reason.
It's important to ensure these paths are accessible and have sufficient storage space, especially if you capture many large images or videos.
Theme
The "Theme" tab allows you to customize the visual appearance of the ShareX user interface. You can choose between light and dark themes, or let ShareX follow your system's theme settings. You can also adjust accent colors and font sizes to personalize the application's look.
Advanced
The "Advanced" tab contains settings that are typically not changed by most users, but offer fine-grained control over various internal behaviors. Examples include logging levels, clipboard monitoring intervals, and other performance-related options. Exercise caution when modifying these settings, as incorrect values can sometimes lead to unexpected behavior.
Task Settings: What Happens After a Capture
"Task settings" define the actions ShareX performs during and after a capture. This is where you configure image effects, watermarks, and automated post-capture workflows. Navigate to "Task settings" from the left menu in the main ShareX window. For more in-depth information, you can explore
capture settings in detail.
Image Settings
This tab is central to how ShareX processes captured images.
- Image format: You can select the default image format (e.g., PNG, JPG, GIF) and adjust quality settings for formats like JPG. PNG is generally recommended for screenshots due to its lossless compression, while JPG can be useful for photographs to reduce file size.
- Add image effects: Enable this to apply a series of predefined image effects. Clicking the "Image effects..." button opens a separate window where you can add, remove, and configure various effects like watermarks, borders, shadows, and more. Effects are applied in the order they appear in the list.
- Watermark: If "Add image effects" is enabled, you can configure a watermark here. This can be text or an image, with options for position, transparency, and size.
Screen Recorder
This tab manages settings specifically for video and GIF recordings.
- Screen recording options: Clicking the "Screen recording options..." button opens a window where you can configure the video codec, framerate, audio source, and output format for recordings. This is also where you set up FFmpeg for advanced video and GIF capture.
- GIF recording options: Similar to video, you can adjust settings for GIF recordings, such as frame rate and quality. Keep in mind that higher frame rates and quality settings result in larger file sizes for GIFs.
After capture tasks
This is one of the most powerful sections within Task settings, allowing you to automate your workflow. After a capture is taken, ShareX can perform a series of actions. Common options include:
- Copy image to clipboard: Puts the captured image on your clipboard for pasting into other applications.
- Save image to file: Saves the image to your designated capture folder.
- Upload image to host: Automatically uploads the image to a configured destination.
- Open in image editor: Launches the ShareX image editor immediately after capture.
- Show "After capture" window: Displays a small window with options for what to do next.
You can enable or disable multiple tasks to create a customized workflow. For example, you might want to automatically save a screenshot to a file, copy it to the clipboard, and then open it in the image editor for quick annotations.
After upload tasks
Similar to after-capture tasks, these actions are performed *after* an item has been successfully uploaded to a host.
- Copy URL to clipboard: Puts the direct link to the uploaded content on your clipboard. This is often the most frequently used after-upload task.
- Show QR code: Generates a QR code for the uploaded URL.
- Shorten URL: If you have a URL shortening service configured (in Destination settings), this option will shorten the URL before copying it.
Destination Settings: Where Files Go
"Destination settings" is where you configure where your captures are ultimately stored or uploaded. This includes local folders, cloud storage services, image hosts, and URL shorteners. You can find this section by clicking "Destinations" in the left menu of the main ShareX window. For a more detailed look at these options, refer to the guide on
upload and destination settings.
Image Uploader
This tab allows you to select your preferred image hosting service. ShareX supports a wide array of services, including Imgur, Flickr, and many others.
- Default uploader: Choose your primary image host from the dropdown list.
- Account configuration: For most services, you'll need to click the "Settings" button next to the dropdown to log in or authorize ShareX to access your account. This is a one-time setup per service.
It's important to note that if you select a custom uploader, its settings will be configured in the "Custom uploader" tab.
File Uploader
Similar to image uploaders, this tab lets you configure services for uploading general files (e.g., documents, videos). Many services, like OneDrive or Google Drive, can be set up here.
Text Uploader
For text-based captures (like OCR results or clipboard text), you can configure services like Pastebin or similar text-sharing platforms.
URL Shortener
If you frequently share links, ShareX can automatically shorten them after upload. This tab allows you to select and configure a URL shortening service.
Custom uploader
This powerful feature allows you to define your own upload destinations using various protocols like HTTP, FTP, or even command-line tools. This is particularly useful for uploading to self-hosted servers or services not natively supported by ShareX. You'll need to provide details like the request method, URL, and any necessary parameters for authentication.
Other destinations
This section includes options for configuring other types of destinations, such as printing, email, or saving to a specific local folder without using the standard "Save image to file" task.
Hotkey Settings in One Sentence
"Hotkey settings" is the dedicated section where you can define and customize keyboard shortcuts for various capture methods, tools, and actions, making your workflow faster and more efficient; for a comprehensive overview, consult the
hotkeys guide.
Backing Up and Moving Your Configuration
ShareX stores all its settings, history, and custom uploaders in a local application data folder. Backing up this folder is crucial for preserving your customized setup. To back up your ShareX configuration:
- Open the main ShareX window.
- Click "Application settings" in the left menu.
- In the "General" tab, click the "Open ShareX folder" button. This will open the folder containing your ShareX application data.
- Navigate up one level in the folder structure (usually to `AppData\Roaming`).
- Locate the `ShareX` folder.
- Copy this entire `ShareX` folder to a safe location, such as a cloud drive or an external hard drive.
To move your configuration to a new Windows computer:
- Install ShareX on the new computer.
- Run ShareX once to create the initial application data folder structure.
- Close ShareX completely (right-click the tray icon and select "Exit").
- On the new computer, open the `AppData\Roaming` folder (you can get there by typing `%appdata%` into the Windows Run dialog or File Explorer address bar).
- Delete the newly created `ShareX` folder.
- Paste the backed-up `ShareX` folder from your old computer into the `AppData\Roaming` directory.
- Launch ShareX. All your settings, history, and custom uploaders should now be restored.
Regularly backing up your configuration is a good practice, especially before making significant system changes or upgrading your operating system.
Settings People Change and Later Regret
While ShareX offers immense flexibility, some settings, when modified without full understanding, can lead to frustration or unexpected behavior.
- Changing default capture folder: While useful, if you set it to a temporary or frequently cleaned folder, you might lose captures. Ensure your custom path is stable and regularly backed up.
- Disabling "Save image to file" in After capture tasks: Many users disable this thinking they only want to upload. However, if an upload fails or you're offline, you won't have a local copy of your capture. It's generally safer to keep "Save image to file" enabled as a fallback.
- Overly aggressive image effects: Applying too many effects or very strong ones (like heavy blurring or dark watermarks) can make your screenshots less readable or professional. Test effects thoroughly before making them permanent.
- Configuring custom uploaders incorrectly: Setting up a custom uploader requires precise details. Incorrect URLs, parameters, or authentication methods will lead to failed uploads without clear error messages, which can be difficult to troubleshoot. Always double-check your custom uploader settings.
- Setting obscure hotkeys: While customization is good, using key combinations that conflict with other applications or are difficult to remember can hinder your efficiency. Stick to intuitive and easily accessible hotkeys, as described in the ShareX walkthrough.
When experimenting with settings, it's a good idea to change one thing at a time and test the results. If something goes wrong, you can easily revert the last change.
Frequently Asked Questions
How do I reset all ShareX settings to default?
To reset ShareX settings, open the main window, go to "Application settings" in the left menu, then to the "General" tab. Click the "Reset settings" button. This will revert all your preferences to their initial state, effectively giving you a fresh start with ShareX.
Can I have different settings for different types of captures?
Yes, to an extent. While core application settings are global, you can configure different hotkeys for various capture types (e.g., region capture, active window capture), and each hotkey can have its own set of "After capture tasks" and "After upload tasks." This allows for highly customized workflows depending on how you initiate the capture.
My uploads are failing. How do I troubleshoot ShareX upload settings?
First, check your internet connection. If that's not the issue, navigate to "Destinations" in the main ShareX window and verify the configuration for your chosen image or file uploader. Ensure your account is correctly authenticated and that there are no expired tokens. For custom uploaders, meticulously review the URL, headers, and body parameters.
Where does ShareX save its captured images and videos by default?
By default, ShareX saves your captured images and videos to a subfolder within your Windows Documents folder. Specifically, it typically creates a `ShareX` folder, then a `Screenshots` or `Videos` subfolder, organized by year and month. You can change this default location in "Application settings" under the "Paths" tab.
Get ShareX for Windows
ShareX is free and open source. Install it, then come back and try the steps above.
Download ShareX