ShareX Workflow Ideas for Everyday Work
Four concrete ShareX workflows built from tasks, after-capture steps, and a couple of well-chosen hotkeys.
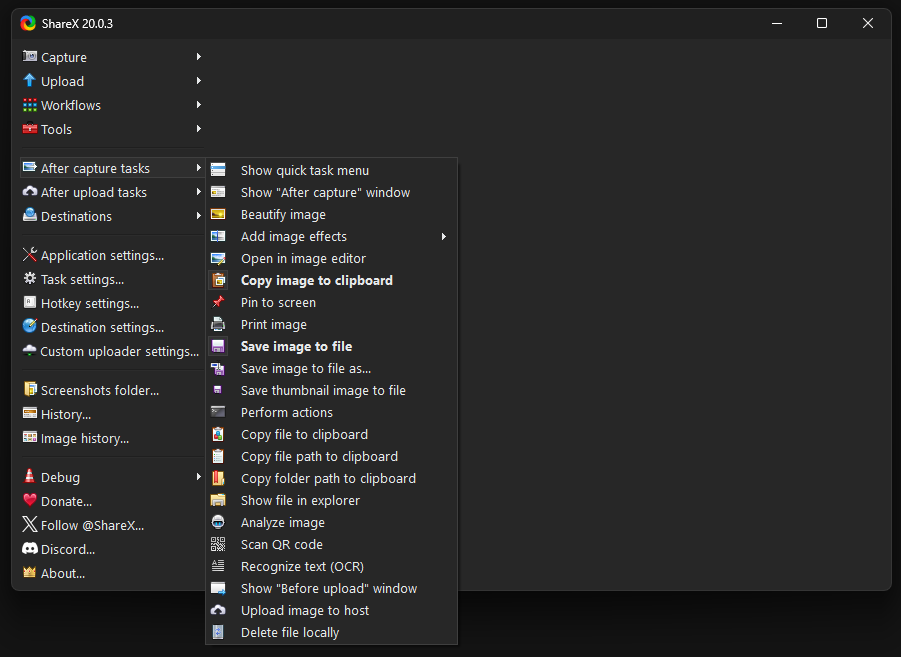
ShareX is a powerful tool for capturing and sharing content on Windows, but its true potential shines when you automate tasks into efficient workflows. A workflow in ShareX is a sequence of automated actions that execute after you perform a capture or another trigger, significantly boosting your productivity. Instead of manually saving, editing, and sharing, ShareX can handle these steps for you, tailored to your specific needs. This guide explores several practical ShareX workflow ideas, demonstrating how to configure them to streamline common tasks. Whether you're providing quick answers, submitting detailed bug reports, creating consistent documentation, or building a local archive, ShareX can adapt to your process.
What a ShareX Workflow Actually Is
At its core, a ShareX workflow is a predefined set of instructions that the application follows after a triggering event. The most common trigger is a screen capture, but workflows can also be initiated by tasks like file uploads, image edits, or even a the ShareX actions reference. The instructions are organized into "After capture tasks" and "After upload tasks," which you configure in the main ShareX window under Task settings.
When you initiate a capture, ShareX first performs the capture itself. Immediately after, it executes any tasks listed under After capture tasks. These tasks might include opening the image editor, adding effects, saving the image to a file, or copying it to the clipboard. Once these initial tasks are complete, if the workflow involves uploading the image (which is optional), ShareX then proceeds to execute any tasks specified under After upload tasks. These typically involve actions like copying the uploaded file's URL to the clipboard, opening the URL in a web browser, or showing a notification.
The flexibility comes from combining these tasks. For example, you might want to automatically save a screenshot to a specific folder, then upload it to an image host, and finally copy the resulting URL to your clipboard—all with a single hotkey press. ShareX allows you to create multiple hotkeys, each with its own customized set of after-capture and after-upload tasks, enabling diverse workflows for different scenarios.
Workflow 1: Fast Answers in Chat
When you're communicating in a chat application and need to quickly share visual information, this workflow streamlines the process of capturing, uploading, and sharing a link.
Configuration Steps
- Open Task Settings: From the main ShareX window, click Task settings on the left panel.
- Configure After capture tasks:
- Ensure Copy image to clipboard is checked. This allows you to paste the raw image directly if the chat application supports it.
- Ensure Upload image to host is checked. This is crucial for getting a shareable link.
- You might want to uncheck Open image in editor to avoid an extra step if you don't need to annotate every capture.
- Consider checking Save image to file if you want a local copy, but for speed, you might leave it unchecked.
- Configure After upload tasks:
- Ensure Copy URL to clipboard is checked. This is the key to quickly sharing the link.
- Optionally, check Show notification to confirm the upload and URL copy.
- Uncheck Open URL to avoid opening a browser tab for every capture.
- Set Default Destination: Click Destinations on the left panel. Under Image uploader, select your preferred image hosting service (e.g., Imgur, ShareX custom uploader for your own server, etc.). Make sure this is configured correctly in upload destinations.
- Create a Hotkey: Go to Hotkey settings in the main ShareX window. Click Add to create a new hotkey.
- For Task, select a capture method like Region capture or Fullscreen capture.
- Under Override after capture tasks, ensure Use default "After capture tasks" is selected. This links it to the settings you just configured.
- Assign a convenient key combination (e.g.,
Ctrl + Shift + 1).
Usage
When you need to share a screenshot:
- Press your assigned hotkey.
- Perform the capture (e.g., drag a region).
- ShareX will capture, upload, and copy the URL to your clipboard.
- Paste the URL into your chat application (
Ctrl + V).
This workflow significantly reduces the steps from capture to sharing a link, making your conversations more efficient.
Workflow 2: Bug Reports With Context
When reporting bugs, a simple screenshot is often insufficient. You need to highlight issues, add annotations, and sometimes include additional system information. This workflow ensures all necessary context is captured and organized.
Configuration Steps
- Open Task Settings: From the main ShareX window, click Task settings.
- Configure After capture tasks:
- Check Open image in editor. This is essential for annotations.
- Check Save image to file. You'll want a local copy of the annotated image.
- Check Copy image to clipboard. This allows quick pasting into bug tracking systems that support it.
- Uncheck Upload image to host unless your bug tracking system relies on external image hosting.
- Configure After upload tasks:
- Ensure all options are unchecked, as we are primarily focusing on local saving and editing for this workflow.
- Set Default Save Path: In Task settings, under Save, configure your Image file directory to a specific folder for bug reports (e.g.,
C:\Users\YourUser\Documents\Bug Reports). You can use variables like%yyyymmdd%to create dated subfolders. - Create a Hotkey: Go to Hotkey settings. Click Add.
- For Task, select Region capture.
- Under Override after capture tasks, ensure Use default "After capture tasks" is selected.
- Assign a hotkey (e.g.,
Ctrl + Shift + 2). - Consider adding a separate hotkey for Active window capture if you frequently capture entire application windows for bugs.
- Optional: Add System Info (as an Action):
- From the main ShareX window, click Tools and then System information.
- Click Copy to clipboard to get the system info.
- You can paste this into your bug report alongside the screenshot. For advanced users, you could configure a custom action to capture system info and save it to a text file, then include that action in a dedicated bug reporting workflow hotkey. This is an advanced topic covered in screenshots for bug reports.
Usage
- Press your bug report hotkey.
- Capture the relevant region or window.
- The ShareX Image Editor will open. Use its annotation tools (arrows, text, highlights) to clearly mark the bug.
- Click Apply to save changes. ShareX will then save the annotated image to your specified folder and copy it to the clipboard.
- Navigate to your bug tracking system. Paste the image directly (if supported) or attach the saved file.
- Optionally, use the System information tool to grab relevant details and paste them into the report.
This workflow ensures that every bug report screenshot is clear, annotated, and consistently saved, providing developers with richer context.
Workflow 3: Documentation Screenshots That Match
Creating documentation requires consistency. Screenshots need to be the same size, have similar effects (like shadows), and be saved in a specific format. This workflow focuses on producing uniform images for manuals, guides, or website content.
Configuration Steps
- Open Task Settings: Click Task settings.
- Configure After capture tasks:
- Check Open image in editor (for minor adjustments or text overlays).
- Check Save image to file.
- Uncheck Copy image to clipboard and Upload image to host, as these are typically not needed for documentation source files.
- Configure After upload tasks:
- Ensure all options are unchecked.
- Define Image Effects:
- In Task settings, click Image effects.
- Click Image effects configuration....
- Here, you can add effects like Watermark (for branding), Shadow, or Border. A common effect for documentation is Drop shadow to make screenshots stand out.
- You can also apply Image resize to ensure all screenshots are a consistent width or height, which is critical for a professional look. For instance, set Width to
800and leave Height empty to maintain aspect ratio. - After configuring, click OK and ensure Apply image effects is checked in Task settings.
- Set Default Save Path and Format:
- In Task settings, under Save, set your Image file directory to your documentation's image folder.
- Set Image format to
PNGfor high quality orJPGif file size is a concern (adjust quality in settings). - Configure File name pattern using variables (e.g.,
DocScreenshot_%pn_%yyyymmdd_hhmmss) to ensure consistent naming.%pnis useful for including the process name.
- Create Hotkeys for Specific Capture Types: Go to Hotkey settings.
- Hotkey 1 (Region Capture): Add a new hotkey.
- Task: Region capture.
- Override after capture tasks: Select Use default "After capture tasks".
- Assign a hotkey (e.g.,
Ctrl + Shift + Dfor Documentation).
- Hotkey 2 (Active Window Capture): Add another hotkey.
- Task: Active window capture.
- Override after capture tasks: Select Use default "After capture tasks".
- Assign a hotkey (e.g.,
Ctrl + Alt + D).
- Hotkey 1 (Region Capture): Add a new hotkey.
Usage
- Press the appropriate documentation hotkey (Region or Active Window).
- Capture the desired content.
- The image will be automatically resized, have effects applied, and be saved to your documentation image folder with a consistent filename. The editor will open if you need to add callouts or text.
- The resulting image is ready to be inserted into your documentation project.
This workflow guarantees uniformity and reduces post-capture editing, saving significant time in documentation projects.
Workflow 4: Local-Only Capture Archive
Sometimes you need to capture information for personal reference, internal records, or when working offline, without uploading anything to the cloud. This workflow focuses on robust local saving and organization.
Configuration Steps
- Open Task Settings: Click Task settings.
- Configure After capture tasks:
- Check Save image to file. This is the primary action.
- Optionally, check Copy image to clipboard if you might immediately paste it elsewhere.
- Uncheck Open image in editor if you rarely need to annotate for this archive.
- Crucially, ensure Upload image to host is unchecked.
- Configure After upload tasks:
- Ensure all options are unchecked, as no upload will occur.
- Set Default Save Path and Format:
- In Task settings, under Save, define your Image file directory. A robust structure using date variables is highly recommended, such as
C:\Users\YourUser\Pictures\ShareX Archive\%yyyymmdd%\. This automatically creates a new subfolder for each day's captures. - For Image format,
PNGis generally best for screenshots due to its lossless compression. - Set a descriptive File name pattern, e.g.,
Archive_%pn_%yyyymmdd_hhmmss. The%pnvariable includes the process name of the active window during capture, which is invaluable for later searching.
- In Task settings, under Save, define your Image file directory. A robust structure using date variables is highly recommended, such as
- Create Hotkeys for Archival Capture: Go to Hotkey settings.
- Hotkey 1 (Region Capture): Add a new hotkey.
- Task: Region capture.
- Override after capture tasks: Select Use default "After capture tasks".
- Assign a hotkey (e.g.,
Ctrl + Shift + Afor Archive).
- Hotkey 2 (Scrolling Capture): Add another hotkey for capturing long web pages or documents.
- Task: Scrolling capture.
- Override after capture tasks: Select Use default "After capture tasks".
- Assign a hotkey (e.g.,
Ctrl + Alt + S).
- Hotkey 3 (Screen Recording): For capturing video snippets for your archive.
- Task: Screen recording (GIF) or Screen recording (MP4).
- Override after capture tasks: Select Use default "After capture tasks".
- Assign a hotkey (e.g.,
Ctrl + Shift + R).
- Hotkey 1 (Region Capture): Add a new hotkey.
Usage
- Press your designated archive hotkey (e.g.,
Ctrl + Shift + A). - Perform the capture.
- ShareX will automatically save the image to the dated folder within your archive directory with a descriptive filename. No data leaves your computer.
This workflow creates a comprehensive, organized local archive of your visual information, perfect for personal knowledge management or compliance requirements.
Actions, Watch Folders, and External Tools
ShareX's power extends beyond simple captures and saves. You can integrate custom actions, monitor folders, and launch external applications to create highly sophisticated workflows.
Custom Actions
Actions allow you to perform additional operations on your captured content. These can be image manipulation (e.g., converting to grayscale, adding watermarks), or even executing custom commands. You can define actions under Task settings > Actions. For example, you could create an action that automatically opens a captured image in an external image editor like Paint.NET or GIMP for more advanced edits, or compresses a GIF even further using an external tool. Once defined, these actions can be added to your "After capture tasks" list, just like built-in ShareX functions. This is where the ShareX actions reference becomes invaluable.
Watch Folders
The Watch folder tool (found under Tools in the main window) allows ShareX to monitor a specific folder for new image files. When a new image appears in that folder, ShareX can automatically perform a predefined set of "After capture tasks" on it. This is useful for integrating with other applications that save images locally. For instance, if another application saves screenshots to a particular folder, ShareX can pick up those images, apply effects, save them to your archive, or even upload them, without you having to manually drag and drop or re-capture.
External Tools Integration
ShareX can launch external applications as part of a workflow. This is configured via Task settings > Actions > Add > Custom action. You specify the executable path and arguments. For example, you might have a custom script that renames files based on metadata, or a specialized OCR tool. After ShareX saves an image, a custom action could pass that image's path to your external tool for further processing. This level of customization allows ShareX to act as a central hub for various image and file manipulation tasks.
Keeping Workflows Maintainable
As you create more ShareX workflows, organization and maintainability become important. Here are some tips:
- Name Hotkeys Clearly: Instead of generic names, use descriptive names like "Chat Screenshot (Upload & Link)" or "Bug Report Capture (Editor & Save)". This helps you quickly identify the purpose of each hotkey in the hotkeys guide.
- Group Hotkeys: If you have many hotkeys, consider organizing them logically. For example, assign
Ctrl + Shift + 1for chat,Ctrl + Shift + 2for bug reports, etc. - Document Your Workflows: For complex setups, especially if others use your ShareX configuration, briefly document the purpose of each hotkey and its associated tasks. A simple text file can suffice.
- Use Default Tasks Wisely: The "Use default 'After capture tasks'" option on hotkeys is powerful. Configure your primary workflow as the default, then create hotkeys that override only specific tasks for specialized needs. This reduces redundancy and makes global changes easier.
- Backup Your Configuration: Regularly back up your ShareX configuration (Application settings > Export/Import). This saves all your hotkeys, task settings, destination configurations, and custom uploaders. It's crucial for disaster recovery or migrating your setup to a new Windows installation.
- Review and Refine: Periodically review your workflows. Are there steps you always skip? Are there new tasks you perform manually that could be automated? ShareX is designed to adapt, so don't hesitate to refine your settings.
Frequently Asked Questions
Can I have different upload destinations for different workflows?
Yes, absolutely. While ShareX has a default image uploader in Destinations, you can override this for specific hotkeys. When creating or editing a hotkey, look for the "Override after capture tasks" section and enable "Override image uploader". You can then select a specific image host for that hotkey, allowing you to upload to Imgur for chat and a custom server for internal documentation, for example.
How do I share a workflow with another ShareX user?
ShareX allows you to export your entire configuration, including hotkeys, task settings, and custom uploaders. Go to Application settings, then Export/Import. You can export to a .sxcu file. The recipient can then import this file to apply your settings. Be mindful that sensitive information like API keys for custom uploaders might be included, so share with trusted individuals.
My hotkey isn't working; what should I check?
First, ensure ShareX is running. Check Hotkey settings to confirm the hotkey is correctly assigned and not conflicting with another application on your system. Sometimes, another program might register the same hotkey first. You can also try assigning a different hotkey combination to rule out conflicts. Also, verify that the "Task" assigned to the hotkey is valid and configured correctly.
Can I add a custom watermark to all my captures for a specific workflow?
Yes. In Task settings, go to Image effects and click Image effects configuration.... Here you can add a "Watermark" effect, specifying text, image, position, and opacity. Once configured, ensure "Apply image effects" is checked in Task settings. If you want this only for a specific workflow, you can create a hotkey that overrides the default after-capture tasks and specifically enables "Apply image effects" while others do not.
How do I automatically open a captured image in an external editor?
You can achieve this using a custom action. Go to Task settings > Actions, click Add, then select Custom action. For the "Command" field, browse to your external editor's executable (e.g., C:\Program Files\Paint.NET\PaintDotNet.exe). For "Arguments", use "%input%", which is a placeholder for the path to the captured image. After saving the action, enable it in your "After capture tasks" list for the desired workflow.
Get ShareX for Windows
ShareX is free and open source. Install it, then come back and try the steps above.
Download ShareX