ShareX Screen Recording Settings Explained
The recorder options that actually change your output: FFmpeg, frame rate, quality, codec, and audio device selection.
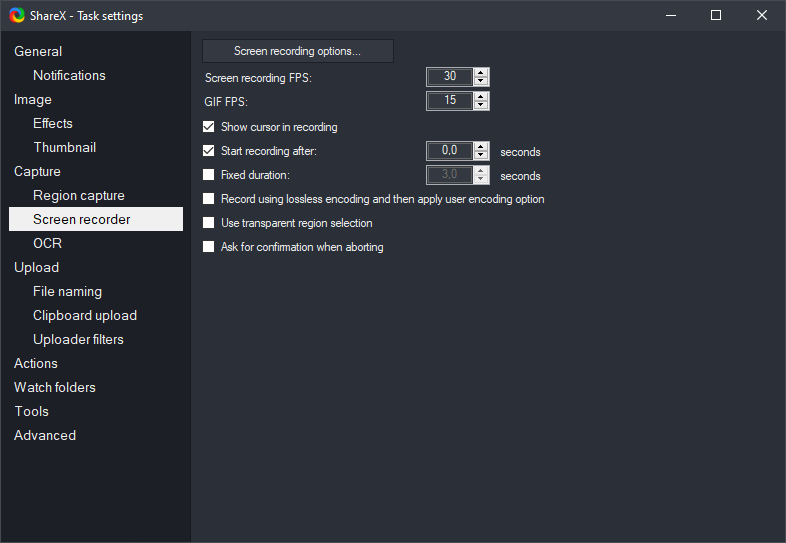
ShareX provides powerful screen recording capabilities, allowing you to capture video of your desktop, specific windows, or regions. Whether you're creating tutorials, demonstrating software, or saving memorable moments, understanding the various settings available in ShareX can significantly enhance the quality and efficiency of your screen recordings. This guide will walk you through the essential configurations to help you optimize your ShareX screen recording experience. Before diving into the specifics, it's helpful to have a general understanding of
the ShareX screen recorder overview. ShareX leverages the FFmpeg multimedia framework for its recording functions, which offers a high degree of control over video and audio parameters.
Where the Recording Settings Live
All screen recording configurations are consolidated within ShareX's main settings interface. To access these settings:
- Open the ShareX main window.
- In the left-hand menu, click on Task settings.
- From the expanded submenu, select Screen recorder.
This section is your central hub for configuring everything from the recording backend to video and audio codecs, quality, and more. You'll find options for both video and GIF recordings here.
FFmpeg: What It Does and How to Install It
FFmpeg is an open-source project that provides a comprehensive suite of libraries and programs for handling video, audio, and other multimedia files and streams. ShareX uses FFmpeg as its backend for all screen recording and GIF creation tasks. Without FFmpeg, ShareX cannot perform these functions.
Why FFmpeg is Necessary
FFmpeg handles the complex processes of capturing raw screen data, encoding it into a video format, and optionally mixing it with audio input. It provides access to a wide range of codecs and container formats, giving ShareX users significant flexibility.
How to Install FFmpeg
ShareX simplifies the FFmpeg installation process:
- Navigate to Task settings > Screen recorder.
- Click the Screen recording options... button. This opens a new window titled "Screen recording options".
- In this new window, ensure the FFmpeg tab is selected.
- Click the Download button. ShareX will then download the necessary FFmpeg binaries and configure them automatically for use.
If you encounter issues with your recordings, ensuring FFmpeg is correctly installed and updated is a good first step to
troubleshoot a failed recording.
Frame Rate and Quality Trade-Offs
The frame rate (frames per second, or FPS) and video quality settings are crucial for balancing file size, recording performance, and visual fidelity. These settings are found within the "Screen recording options" window, under the
FFmpegtab.
Frame Rate (FPS)
The frame rate determines how many still images (frames) are captured per second to create the video.
- Lower FPS (e.g., 10-15): Suitable for recordings where motion is minimal, such as static presentations or simple demonstrations. Results in smaller file sizes and lower CPU usage during recording.
- Standard FPS (e.g., 25-30): A common choice for general desktop activity, software demonstrations, and web browsing. Provides smooth enough motion for most purposes without excessively large files.
- Higher FPS (e.g., 45-60): Ideal for recording fast-paced content, like gaming or intricate animations, where fluid motion is critical. This will result in larger file sizes and requires more processing power from your system.
You can set the desired FPS in the "Screen recording options" window. Experiment to find a balance that suits your content and system capabilities.
Quality Settings
Video quality is often controlled by a "Constant Rate Factor" (CRF) for H.264/H.265 codecs or a "Quality" slider for other codecs.
- CRF (Constant Rate Factor): For codecs like H.264 (x264) or H.265 (x265), a lower CRF value indicates higher quality and a larger file size. A CRF of 18-23 is generally considered visually lossless for many applications, with 0 being lossless and 51 being the lowest quality.
- Quality Slider: Some codecs might offer a simpler quality slider. Higher values typically mean better quality and larger files.
Consider the purpose of your recording. For archival or professional use, higher quality is preferable. For quick shares or temporary recordings, a lower quality setting can save disk space and upload time.
Choosing a Video Codec and Container
The video codec determines how the video data is encoded and decoded, impacting quality, file size, and compatibility. The container format (e.g., MP4, WebM) is essentially a wrapper that holds the encoded video stream, audio stream, and other metadata.
Video Codecs
Within the
Screen recording options > FFmpegtab, you'll find a dropdown for "Video encoder". Common choices include:
- H.264 (x264): A widely supported and efficient codec, offering a good balance of quality and file size. It's an excellent default choice for most users.
- H.265 (x265): Offers better compression efficiency than H.264, meaning similar quality at smaller file sizes. However, it requires more processing power for encoding and decoding, and might not be as universally supported by older players or systems.
- VP8/VP9: Open-source codecs often used with the WebM container, particularly for web-based video.
- MPEG-4: An older, less efficient codec compared to H.264, but still widely compatible.
For general use, H.264 is recommended due to its broad compatibility and efficiency. If file size is a critical concern and you have modern hardware, H.265 is a strong alternative.
Container Formats
The "Video format" dropdown allows you to choose the container:
- MP4 (.mp4): The most common and widely supported container. Highly recommended for general use due to its compatibility across almost all devices and platforms.
- WebM (.webm): An open, royalty-free media file format for video and audio. Often used for web video, but less universally supported than MP4 for offline playback.
- MKV (.mkv): A flexible container that can hold various video and audio tracks. Less common than MP4 but useful for advanced scenarios.
Unless you have a specific reason to choose otherwise,
MP4is the best default container format for your ShareX screen recordings.
Audio Devices and Levels
Capturing audio alongside your screen video is often essential. ShareX allows you to select specific audio input devices and adjust their levels. These settings are also found in the "Screen recording options" window, under the
Audio sourcesection.
Selecting Audio Devices
You can choose to record audio from several sources:
- Microphone: Select your preferred microphone from the "Audio source 1" dropdown. This is useful for narrating tutorials or adding voiceovers.
- System Audio (Speakers): To capture sounds playing through your computer's speakers, select your system's output device (e.g., "Stereo Mix," "What U Hear," or "Speakers") from the "Audio source 2" dropdown. Note that some audio drivers might not expose a "Stereo Mix" option. In such cases, you might need to enable it in your Windows Sound settings or use third-party virtual audio cables.
- No Audio: If you only need video, leave both audio sources set to "None".
You can record from one or two audio sources simultaneously. For example, you can record both your microphone and system audio to capture your commentary alongside application sounds.
Adjusting Audio Levels
Next to each selected audio source, you'll find a volume slider.
- Volume Slider: Adjust this to control the input level of each audio source. It's crucial to set these correctly to avoid audio that is too quiet or, more commonly, too loud and distorted (clipping).
- Testing: It's highly recommended to perform a short test recording and listen back to the audio to ensure levels are appropriate before a critical recording session.
Always check your audio settings before starting a recording to ensure clear and balanced sound.
GIF-Specific Settings
While ShareX primarily focuses on video recording, it also offers robust GIF recording capabilities. GIFs are ideal for short, looping animations or demonstrations where small file size and universal compatibility (without needing a video player) are paramount. The GIF settings are integrated within the same "Screen recording options" window.
GIF Encoder
Under the
GIFtab in "Screen recording options", you'll find settings specific to GIF creation.
- FFmpeg: ShareX uses FFmpeg to convert video frames into a GIF. This typically offers better quality and more control than older GIF recording methods.
Frame Rate and Quality for GIFs
GIFs have their own frame rate and quality considerations:
- Frame Rate: Since GIFs are often short and motion can be less critical than video, a lower frame rate (e.g., 10-15 FPS) is often sufficient and helps keep file sizes down. Higher FPS will create smoother animations but significantly larger GIF files.
- Color Reduction and Dithering: GIFs are limited to 256 colors. ShareX provides options for color reduction algorithms and dithering. Dithering adds noise to simulate more colors, which can improve visual quality but might increase file size. Experiment with these settings to find the best balance for your content.
Looping and Delay
GIFs are inherently looping. You typically don't need to configure looping specifically within ShareX, as it's a characteristic of the format. However, you can control the speed by adjusting the frame rate. Remember that GIFs are not suitable for long recordings or those requiring high fidelity audio, as they do not support audio and can produce very large files for extended durations or complex visual content.
Output Folders and File Naming
After your screen recording is complete, ShareX saves the file to a designated location on your computer. Configuring the output folder and file naming convention helps keep your captures organized. These settings are part of
the wider ShareX settings map, not specifically within the "Screen recording options" window.
Output Folder
To set your output folder:
- From the ShareX main window, click Application settings in the left-hand menu.
- Select Path from the submenu.
- The "Screenshots folder" field specifies where all captures, including screen recordings, are saved by default. You can click the Browse... button to choose a different folder.
It's a good practice to set a dedicated folder for your ShareX captures to easily find them later.
File Naming
ShareX offers flexible file naming conventions:
- In Application settings > Path, locate the "File naming" section.
- You can customize the naming pattern using various placeholders (e.g.,
%yfor year,%mofor month,%dfor day,%hfor hour,%mifor minute,%sfor second,%pnfor process name,%rfor random characters). - A common and useful pattern for screen recordings might be
%pn_%y-%mo-%d_%h-%mi-%s, which includes the process name of the active window, date, and time.
This allows for automatic, descriptive file names, making it easier to identify recordings without having to open them. For a complete
recording walkthrough, consult our step-by-step guide.
Frequently Asked Questions
Why is my ShareX screen recording choppy or lagging?
Choppy recordings are often due to a high frame rate, high quality settings, or a demanding video codec that your system hardware struggles to process in real-time. Try reducing the frame rate (e.g., from 60 FPS to 30 FPS) or lowering the quality (increasing CRF value) in the "Screen recording options" to reduce the load on your CPU and storage.
How do I record system audio and my microphone simultaneously?
In the "Screen recording options" window, under the Audio source section, select your microphone as "Audio source 1" and your system's output device (like "Stereo Mix" or "Speakers") as "Audio source 2". Ensure both volume sliders are adjusted appropriately to prevent clipping or low audio levels.
My recordings are very large. How can I reduce the file size?
To reduce file size, you can lower the frame rate, increase the Constant Rate Factor (CRF) for H.264/H.265 codecs (a higher CRF means smaller file but lower quality), or choose a more efficient video codec like H.265 if your system supports it. Also, consider recording only the necessary region of your screen instead of the entire desktop.
Can I change the video format after recording?
ShareX does not directly offer post-recording format conversion within its screen recording settings. However, you can use the built-in "Video converter" tool found under the Tools menu in the ShareX main window to convert existing video files to different formats or codecs.
Why is there no "Stereo Mix" option for system audio?
The "Stereo Mix" or "What U Hear" option is dependent on your sound card's drivers. If it's not listed, it might be disabled in your Windows Sound settings (right-click the speaker icon in the taskbar, select "Sounds," go to the "Recording" tab, right-click, and show disabled devices). If still unavailable, you might need to update your audio drivers or use a third-party virtual audio cable solution.
Get ShareX for Windows
ShareX is free and open source. Install it, then come back and try the steps above.
Download ShareX